You walk into your utility closet or basement, and the copper suction line running out of the air handler looks like a frozen popsicle. The house is uncomfortably sticky, the outdoor unit is howling, and your first thought is probably the same one almost every homeowner has: “It just needs a shot of Freon.”
Before you let anyone hook up a drum of refrigerant, step back. In the field, I see uncertified handymen fall into that trap all the time. They spot a block of ice, assume the system is leaking gas, pump in two extra pounds, and end up destroying a good compressor by evening.
More often than not, the culprit is a failed thermostatic expansion valve (TXV) stuck wide open.
Fast Diagnostic Answer:
Primary HVAC expansion valve stuck open symptoms include a frozen evaporator coil, a heavily sweating or frosted copper suction line extending to the outdoor unit, an indoor coil that hisses constantly, low superheat readings (often 0°F to 4°F), and an overheated compressor struggling against liquid floodback.
Recognizing these symptoms early prevents catastrophic damage to your compressor. Left unchecked, a stuck open valve can turn an easily fixable valve swap into a multi-thousand-dollar system replacement.
What You'll Learn ⭐⭐⭐⭐⭐
- What Happens When a TXV Gets Stuck in the Open Position?
- The Mechanics of Refrigerant Overfeed
- TXV Stuck Open vs. TXV Stuck Closed: The Key Differences
- TXV Stuck Open vs. Overcharged System: How to Tell Them Apart
- 5 Warning Signs of HVAC Expansion Valve Stuck Open Symptoms
- 1. Frost and Ice Crawling All the Way to the Outdoor Compressor
- 2. Low Superheat Coupled with Elevated Suction Pressure
- 3. AC Blowing Warm Air and High Indoor Humidity
- 4. Excessive Suction Line Sweating and Coil Hissing
- 5. Compressor Knocking and Thermal Overload Trips
- Homeowner Triage: Safe Checks Before Calling a Pro
- Measure the Airflow Temperature Split (ΔT)
- Hidden Root Causes Most Guides Overlook
- Special Considerations: Heat Pumps and Inverter EEV Systems
- Electronic Expansion Valves (EEV) on Inverter Systems
- Diagnostic Cheat Sheet: Symptom, Cause, and Action Plan
- Can You Clean a Stuck TXV, or Must It Be Replaced?
- When to Stop: The Line Between DIY Checks and Licensed Repairs
- What a Professional TXV Repair Involves
- Technical Questions Answered
- Can a stuck open expansion valve ruin my compressor?
- Can tapping the valve body unstick a jammed TXV?
- How does moisture freeze an expansion valve open?
What Happens When a TXV Gets Stuck in the Open Position?
Your thermostatic expansion valve acts as the metering traffic cop for your cooling system. It separates the high-pressure liquid coming from your outdoor condenser from the low-pressure cold liquid entering your indoor evaporator coil.
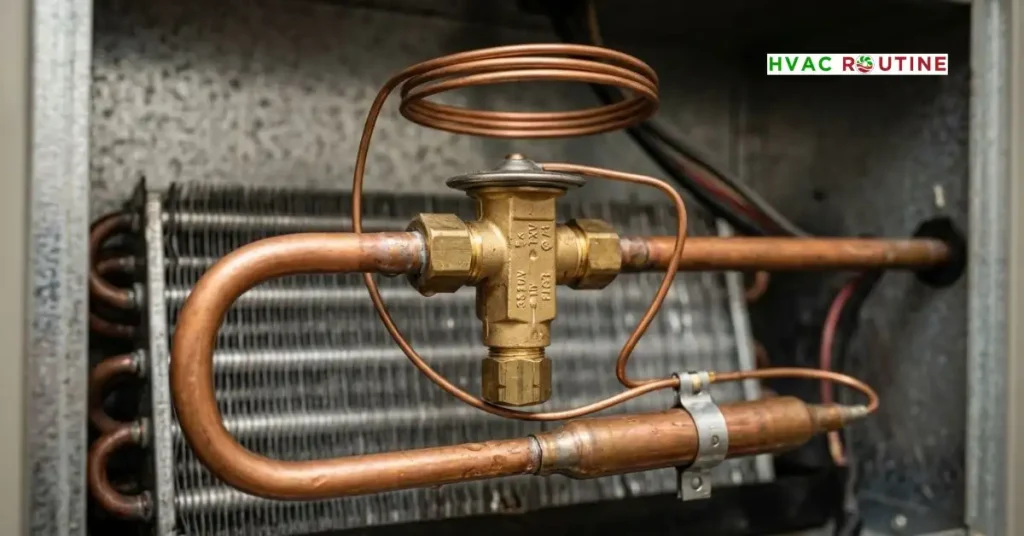
Under normal operation, the valve pin moves inward and outward by fractions of an inch. It balances three distinct forces: bulb pressure pushing down to open the valve, evaporator pressure pushing up to close it, and spring tension pushing up to assist closure. When those mechanical forces lose balance, the valve fails.
The Mechanics of Refrigerant Overfeed
When the internal needle valve binds, corrodes, or jams open, the valve stops regulating. Instead of spraying a controlled mist, high-pressure liquid surges unchecked into the evaporator coil.
Your indoor blower cannot supply enough heat energy to vaporize that massive volume of liquid. As a result, unboiled liquid refrigerant exits the coil, chilling the return piping well past its target design temperature.
TXV Stuck Open vs. TXV Stuck Closed: The Key Differences
Homeowners often confuse a valve stuck open with one stuck closed because both can freeze the indoor coil. The difference lies in where the ice starts and what your operating pressures show:
- Stuck Open (Overfeeding): Produces low superheat combined with normal or high suction pressure. The suction line freezes starting from the coil outlet and creeps outdoors toward the compressor.
- Stuck Closed (Starvation): Starves the coil of refrigerant, producing extremely high superheat and near-zero suction pressure. The coil freezes near the inlet distributor tubes, while the suction line remains warm to the touch.
TXV Stuck Open vs. Overcharged System: How to Tell Them Apart
Both a stuck-open TXV and an overcharged system show low superheat and high suction pressure on your manifold gauges. The definitive diagnostic separator is liquid line subcooling:
- Stuck Open TXV: Low superheat (0°F – 4°F) paired with normal to low subcooling (4°F – 8°F). Because the valve orifice remains wide open, liquid refrigerant rushes out of the condenser faster than it can stack up and subcool.
- Overcharged System: Low superheat paired with abnormally high subcooling (> 16°F – 22°F). The condenser coil is overfilled with excess liquid refrigerant, forcing high liquid pressures and excessive temperature drops before the metering device.
5 Warning Signs of HVAC Expansion Valve Stuck Open Symptoms
Recognizing these five physical and operational warning signs helps you pinpoint whether your TXV is flooding the system.
1. Frost and Ice Crawling All the Way to the Outdoor Compressor
A frozen indoor coil happens for several reasons, but ice traveling down the thick insulated copper pipe all the way outside is a hallmark of refrigerant overfeed.
Because the excess liquid cannot boil off inside the evaporator, it continues to boil inside the suction line itself. If you peel back the black foam insulation tape near the outdoor service valve and find thick ice, liquid refrigerant is traveling where only vapor should go.
2. Low Superheat Coupled with Elevated Suction Pressure
For technicians and advanced DIYers with manifold gauges and pipe clamp thermocouples, pressure and temperature readings tell the whole story.
A stuck open valve floods the evaporator, driving target superheat down into the danger zone between 0°F and 3°F. Meanwhile, your suction pressure (low-side) will read at or above normal operating levels across common residential refrigerants:
- R-410A Systems: Low-side pressure typically runs elevated between 135 to 155+ PSI with near-zero superheat at an 80°F indoor load (normal is 118–130 PSI with 8°F–14°F superheat).
- R-32 Systems: Low-side pressure climbs to 140 to 160+ PSI with flooded superheat readings.
- Legacy R-22 Systems: Low-side pressure reads 75 to 88+ PSI instead of the standard 68–72 PSI design window.
3. AC Blowing Warm Air and High Indoor Humidity
You might expect a flooding coil to make your house colder, but the opposite happens. When refrigerant rushes through the coil tubes too quickly, it fails to maintain the correct pressure-temperature relationship required for efficient heat transfer.
Your air conditioner will run continuously without satisfying the thermostat. Even worse, the indoor air will feel clammy and humid because the overfed coil cannot drop air temperatures down to its dew point.
4. Excessive Suction Line Sweating and Coil Hissing
Before thick ice forms, you will notice excessive moisture. The suction line will sweat profusely, dripping water through the plenum seams and overflowing your condensate drain pan.
Listen closely at the air handler cabinet with the blower access panel secured. A healthy TXV produces a soft, rhythmic whisper; an overfeeding valve emits a loud, turbulent hissing or gurgling sound as high-pressure liquid tears through the wide-open seat.
5. Compressor Knocking and Thermal Overload Trips
Compressors are vapor pumps; they cannot compress liquids. When unevaporated liquid refrigerant enters the compressor cylinder or scroll pockets, it creates a condition called liquid slugging.
Slugging causes metallic knocking, violent vibration, and sometimes a sharp, metallic hot-oil odor around the outdoor cabinet. The liquid refrigerant washes away the protective POE oil from the bearings. Without lubrication, internal friction spikes, tripping the compressor’s internal thermal overload protector and shutting the outdoor unit down every 10 to 15 minutes.
Safety Warning:
Do not attempt to run your AC in “fan-only” or light cooling mode while diagnosing a frozen suction line. Running a compressor actively flooded with liquid refrigerant will destroy its internal scrolls or snap connecting rods within hours, escalating a repair bill into a full system replacement.
Homeowner Triage: Safe Checks Before Calling a Pro
Before spending hundreds of dollars on a service call, perform these hands-on diagnostic checks to rule out minor mechanical oversights.
Shut Down Power at Both Disconnects
Flip the indoor air handler breaker at your main electrical panel. Move to the outdoor condenser and pull the pull-out disconnect handle from the wall box. Confirm zero voltage with a calibrated non-contact voltage tester before removing any access panels.
Measure the Airflow Temperature Split (ΔT)
Before opening panels, check the temperature difference between the return air grille and the supply register nearest the air handler using an instant-read probe thermometer. A healthy cooling system produces a temperature drop (ΔT) between 16°F and 22°F. A stuck-open TXV overfloods the coil, collapsing your temperature split down to a sluggish 6°F to 10°F despite continuous blower operation.
Inspect and Reposition the Sensing Bulb
Remove the indoor coil door and find the copper bulb clamped to the suction line near the outlet. Clean the copper pipe with an abrasive pad so the bulb sits flush against bare metal:
- Pipes 7/8-inch or smaller: Mount the bulb firmly at the 10 o’clock or 2 o’clock position.Pipes 1-1/8-inch or larger: Mount the bulb at the 4 o’clock or 8 o’clock position.
Field Note: Last summer, I took a call where a homeowner was quoted $2,400 for a dead compressor. When I opened the coil cabinet, the TXV sensing bulb was dangling loose in mid-air; the plastic cable tie holding it had snapped. The bulb was reading 86°F attic air, forcing the valve wide open and freezing the entire line. Re-clamping the bulb and insulating it with cork tape solved the issue in twenty minutes.
Verify Airflow and Clean the Evaporator Coil
Pull your air filter and inspect it against a light source; replace any clogged 1-inch or 4-inch pleated media. Inspect the indoor coil face for pet dander or dust mats. If the aluminum fins are bent, straighten them carefully using an appropriate fin comb to guarantee full airflow across the circuit.
Test the Outdoor Dual Run Capacitor
Open the electrical compartment of the outdoor unit. Using an insulated screwdriver, discharge the dual run capacitor across the terminals. Set your digital multimeter to capacitance (µF) and test the HERM and FAN terminals against Common. A weakened capacitor (for example, reading 38 µF on a 45/5 µF rated can) slows down the condenser fan, causing severe pressure imbalances that mimic valve failures.
Execute the Warm Rag Field Test
Loosen the sensing bulb from the suction line while leaving the valve body connected. Start the air conditioner and wrap the bare bulb in a warm, damp cloth for two minutes while observing your suction line. If the line does not rapidly drop in temperature or respond when you switch to an ice-water bath, the internal valve diaphragm or spring has failed mechanically.
Hidden Root Causes Most Guides Overlook
Beyond basic wear, several lesser-known mechanical faults force a metering device wide open.
Pinched or Blocked External Equalizer Tube
On larger residential evaporators, an external equalizer tube connects the suction line downstream of the sensing bulb to the bottom of the TXV diaphragm. This tube compensates for pressure drops across the evaporator coil. If an installer kinks or pinches this thin 1/4-inch copper tube during service, or if debris plugs the port, the diaphragm cannot register true coil outlet pressure. The imbalance holds the valve needle jammed wide open.
Non-Condensables (Air and Nitrogen) Trapped in the Loop
If an installer skips a deep vacuum or uses contaminated manifold hoses, non-condensable air remains trapped inside the refrigerant circuit. These gases collect in the condenser, causing erratic needle flutter on your high-side pressure gauge and spiking head pressures. The intense hydraulic force pushes against the valve pin, forcing it past its normal metering seat.
Moisture Freezing at the Orifice Seat
When trace water vapor mixes with refrigerant, it circulates freely until reaching the pin seat. The rapid drop in pressure causes an instantaneous flash freeze, turning moisture into an ice pellet that locks the valve pin open.
Special Considerations: Heat Pumps and Inverter EEV Systems
Troubleshooting changes slightly depending on whether your equipment uses a mechanical valve or an electronic stepper motor.
Heat Pumps in Cooling vs. Heating Mode
Heat pumps utilize two separate expansion devices: an indoor valve for cooling and an outdoor valve for heating, accompanied by check valves that route refrigerant based on reversing valve orientation.
- Cooling Mode Failure: A stuck indoor TXV creates the classic iced indoor coil and flooded outdoor line.
- Heating Mode Failure: A stuck outdoor TXV overfeeds the outdoor coil in winter. The outdoor unit develops heavy, uneven ice sheets, the defrost cycle initiates prematurely, and indoor heating output drops to lukewarm room temperatures.
Electronic Expansion Valves (EEV) on Inverter Systems
Modern variable-speed and ductless mini-split units replace mechanical bulbs with electronic expansion valves (EEVs) driven by digital stepper motors.
- When an EEV sticks open, it is typically caused by a failed stepper motor coil or a corrupted driver signal from the main inverter PCB rather than a blown sensing bulb.
- Technicians diagnose an EEV by removing the stepper coil head from the brass body and checking resistance across the winding terminals with a multimeter (typically 40 to 50 ohms between phase pins, depending on manufacturer specifications).
Diagnostic Cheat Sheet: Symptom, Cause, and Action Plan
| Observable Symptom | Probable Mechanical Cause | Action Plan | Safe DIY or Pro? |
| Suction line frosted from coil to compressor | Valve needle jammed open; liquid overfeeding | Shut unit off at thermostat immediately to protect compressor | DIY (Shut down) |
| Sensing bulb hanging loose or uninsulated | Bulb registers warm closet air, driving valve wide open | Clean copper line, mount at 10 or 2 o’clock, seal with cork tape | Safe DIY |
| Air temperature drop ($\Delta T$) under 10°F | Overflooded coil failing to absorb latent and sensible heat | Clean filter, verify fan speed, inspect TXV superheat | DIY / Pro |
| Low superheat with high subcooling | Refrigerant overcharge (not an expansion valve failure) | Recover excess refrigerant to factory nameplate target | Licensed Pro |
| Low superheat with normal or low subcooling | Valve orifice jammed by debris or internal spring failure | Recover refrigerant, flush lines, replace TXV assembly | Licensed Pro |
| Kinked 1/4-inch external equalizer line | Pressure cannot push up against diaphragm; pin forced open | Straighten or braze in new copper equalizer tube | Licensed Pro |
| Compressor hums loudly, cuts off within 60 seconds | Internal thermal overload switch tripped from oil washout | Keep power off; check capacitor and terminal resistance | Licensed Pro |
Can You Clean a Stuck TXV, or Must It Be Replaced?
Homeowners often ask if a clogged or stuck expansion valve can be flushed out with solvent.
If the pin is stuck due to minor foreign particulate, a technician can occasionally tap the brass body or blow dry nitrogen backwards through the circuit to dislodge grit. However, in more than 90% of field failures, the cause is mechanical:
- The internal power-head diaphragm has ruptured, leaking its charge.
- The internal biasing spring has collapsed or lost tension.
- Acid or moisture has etched and pitted the needle seat.
Solvents and flushes cannot repair a ruptured diaphragm or a worn brass seat. Attempting chemical flushes wastes labor hours; replacing the complete valve assembly is the only lasting solution.
When to Stop: The Line Between DIY Checks and Licensed Repairs

Tightening a bulb clamp, checking a capacitor, or clearing an air filter are safe weekend DIY tasks. However, opening any sealed refrigerant loop requires an EPA Section 608 Universal Certification. Venting refrigerant into the atmosphere carries severe federal fines, and handling pressurized R-410A without dedicated recovery gear risks instant frostbite or chemical burns.
What a Professional TXV Repair Involves
When hiring a licensed HVAC contractor, ensure their scope of work follows proper industry procedures:
- Refrigerant Recovery: Reclaim remaining refrigerant into an approved recovery cylinder using a certified recovery unit.
- Nitrogen-Swept Brazing: Unbraze the failed valve and braze in the OEM replacement while purging dry nitrogen at 2 to 3 PSI to eliminate internal copper oxidation scale.
- Mandatory Filter Drier Replacement: The technician must braze in a fresh liquid line filter drier. Any reputable tech will replace this as a rule, not an upsell. Opening the system exposes the lines to ambient moisture, and leaving the old drier risks contaminating the new valve immediately.
- Triple Evacuation: Pull a deep vacuum below 500 microns with a two-stage vacuum pump and micron gauge to boil out trapped moisture.
- Recharging by Weight: Weigh in virgin refrigerant with a digital scale to the exact ounce specification on the outdoor data plate.
Expect a professional TXV replacement to cost between $650 and $1,800, depending on refrigerant type, accessibility, and warranty coverage.
A candid word of technician advice: if your system is over 12 to 14 years old and runs on phased-out R-22 refrigerant, do not sink $1,200 or more into a valve replacement. R-22 is prohibitively expensive to recharge, and old coils often develop leaks shortly after high-temperature brazing. Putting that money toward a modern, high-efficiency split system is usually the wiser investment.
Technical Questions Answered
Can a stuck open expansion valve ruin my compressor?
Yes. Compressors cannot compress liquid. When liquid refrigerant floods back to the outdoor unit, it washes away the oil film lubricating the scroll plates or pistons. The mechanical parts quickly overheat, scour against each other, and suffer fatal hydraulic shock.
Can tapping the valve body unstick a jammed TXV?
Lightly tapping the brass base of the valve body with the rubber or plastic handle of a screwdriver can sometimes dislodge small metal burrs or solder slag. Never strike the top power head dome or the thin capillary tube, as denting either component ruins the valve permanently.
How does moisture freeze an expansion valve open?
If an installer fails to pull a vacuum below 500 microns during commissioning, moisture remains trapped inside the lines. This water circulates with the refrigerant until it hits the high-to-low pressure drop at the expansion orifice, where it instantly freezes into ice crystals that can lock the metering needle wide open.