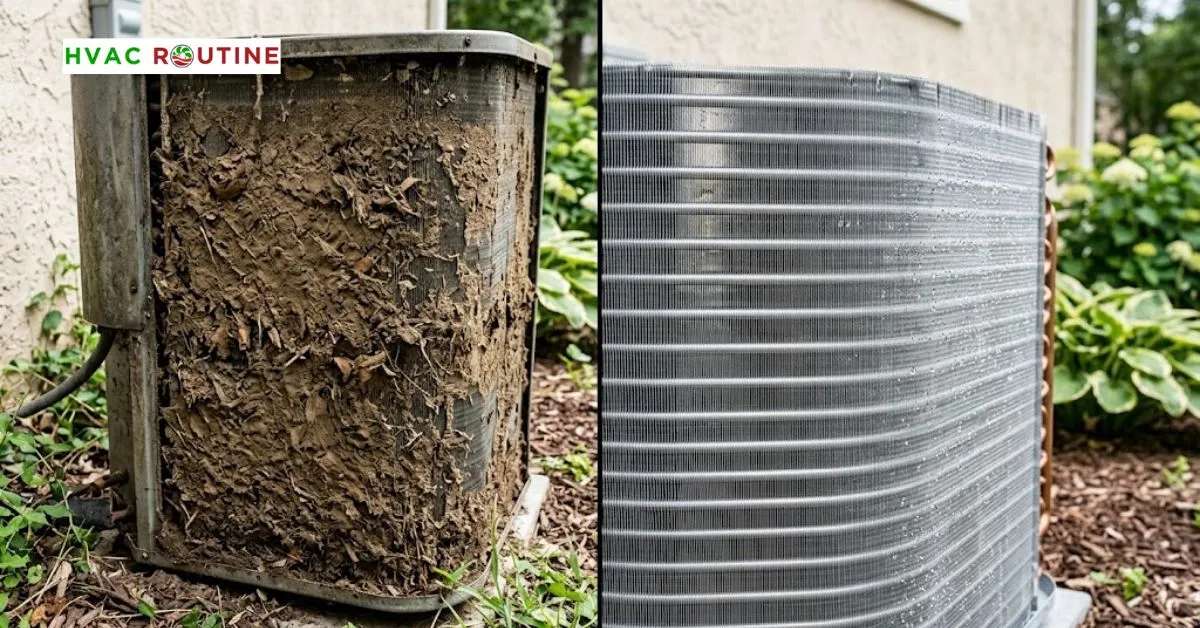
Every summer, thousands of homeowners watch their electric bills spike while their cooling vents blow lukewarm air. In most cases, the system isn’t broken—it is simply suffocating under a thick blanket of grime. Learning how to clean AC coils ranks among the most rewarding DIY maintenance projects you can tackle over a weekend.
Data from the U.S. Department of Energy shows that dirty coils force your compressor to consume up to 30 percent more electricity just to keep your living room tolerable. Dirt insulates heat exchangers, raises operating pressures, and wears out fan motors long before their time. Mastering how to clean AC coils protects your cooling system from catastrophic failures and saves you a steep $200 to $400 professional service fee. This guide walks you through every step to clean your outdoor condenser, indoor evaporator, and ductless mini-split units safely and effectively.
Project Overview at a Glance
| Parameter | Project Specifications |
| Difficulty Level | Intermediate DIY |
| Total Project Time | 1.5 to 2 Hours |
| Active Labor Time | 45 to 60 Minutes |
| Estimated DIY Cost | $20 – $40 (Chemicals and fin comb) |
| Estimated Savings | $150 – $350 compared to professional deep washing |
| Required Skill | Basic hand-tool operation and electrical disconnect safety |
What You'll Learn ⭐⭐⭐⭐⭐
- Project Overview at a Glance
- Evaporator Coils vs. Condenser Coils: Understanding the Difference
- The Indoor Evaporator Coil (Cold Side)
- The Outdoor Condenser Coil (Hot Side)
- Important Hardware Exceptions: Fin Types and Coil Construction
- Standard Tube-and-Fin
- All-Aluminum Microchannel
- Spine-Fin (Trane)
- Cost Comparison: DIY vs. Professional HVAC Cleaning
- Choosing Your Cleaner: The Chemistry Matters
- Acidic (pH 1–3)
- Neutral (pH 7–8)
- High Alkaline (pH 11–13)
- Can You Use Dawn Dish Soap Instead?
- Safety Protocols: Respecting High-Voltage Current
- How to Clean AC Coils on Your Outdoor Condenser (Step-by-Step)
- Step 1: Remove the Top Fan Assembly
- Step 2: Clear Out Deep Debris
- Step 3: Spray Your Cleaning Solution
- Step 4: Rinse the Fins from the Inside Out
- Step 5: Straighten Crushed Metal Fins
- Can You Clean Condenser Coils Without Taking the Cabinet Apart?
- Indoor Evaporator Coil Cleaning: Taming the A-Coil
- Cleaning Ductless Mini-Split Coils
- Safe Drying Times Before Restoring Power
- Measuring Your Results: The Delta-T Temperature Split
- Troubleshooting Post-Cleaning Glitches
- How to Winterize Your Outdoor Condenser the Right Way
- Frequently Asked Questions About Cleaning AC Coils
- Can I clean AC coils without taking the unit apart?
- What happens if I never clean my AC coils?
- Smart Maintenance Habits for Lower Summer Energy Bills
Evaporator Coils vs. Condenser Coils: Understanding the Difference
Your central air conditioner does not generate cold air out of thin air. Instead, it absorbs heat from inside your living spaces and dumps that heat into the outdoor atmosphere. Two dedicated heat exchangers manage this continuous cycle, and they face completely different types of debris.
The Indoor Evaporator Coil (Cold Side)
Your indoor evaporator coil sits tucked away inside the air handler or sheet-metal plenum right above or below your furnace. This cold component extracts heat and humidity from your return airflow. Because moisture constantly drips across the cold metal surface, fine household dust, pet dander, lint, and mold spores stick to it like glue.
The Outdoor Condenser Coil (Hot Side)
Your condenser coil wraps around the perimeter of the metal cage sitting in your backyard. The top exhaust fan pulls outside air across hot copper tubes and aluminum fins to exhaust that captured indoor heat. This outdoor coil takes a beating from lawn mower clippings, dry autumn leaves, yellow spring pollen, and road dust. When dirt cakes onto either of these coils, heat exchange slows to a crawl.
Important Hardware Exceptions: Fin Types and Coil Construction
Before you grab a wrench, inspect your outdoor unit’s data plate and fin design. Treating every air conditioner with the same universal brush or tool can ruin high-end equipment.
Standard Tube-and-Fin
Flat Aluminum Fins & Copper Tubes
- Traditional plate-fin configuration
- Fins bend easily from direct pressure
- Straighten using standard fin comb
All-Aluminum Microchannel
Flat Multi-Port Micro-Tubes
- Dense spacing clogs fast with pollen
- Never use harsh alkaline chemicals
- Rinse gently with low pressure
Spine-Fin (Trane)
Spiny Aluminum Bristles
- Thousands of tiny spiny bristles
- Combing strips bristles permanently
- Clean only with foam soak and rinse
1. Traditional Copper Tube and Aluminum Plate Fins
Most residential condensing units use round copper refrigerant tubes surrounded by flat, paper-thin aluminum fins. These fins bend easily under physical impact or heavy water pressure, but they are simple to straighten. Standard multi-gauge HVAC fin combs work wonders on these traditional units.
2. All-Aluminum Microchannel Coils
Many modern high-efficiency systems use flat, extruded aluminum microchannel tubes with zigzagging fins between them. These coils pack an immense amount of surface area into a narrow footprint, which means they clog faster than traditional coils. Microchannel tubes also react poorly to aggressive alkaline chemicals. Always stick with pH-neutral cleaners on microchannel systems to avoid pinhole leaks.
3. Spine-Fin Coils (Trane and American Standard)
Trane and American Standard units frequently feature thousands of tiny, spiny aluminum bristles wrapped tightly around copper refrigerant lines. Never run a fin comb through a spine-fin coil. A fin comb will rip those delicate bristles straight off the tubing and permanently wreck the coil’s heat transfer surface. Clean spine-fin units using chemical foam and low-pressure water flushes only.
Cost Comparison: DIY vs. Professional HVAC Cleaning
Taking on this task yourself delivers massive savings compared to scheduling routine contractor visits.
| Service Option | Average Cost (USD) | Time Required | Best Suited For |
| DIY Coil Cleaning | $20 – $40 (Cleaner & Fin Comb) | 1 to 2 Hours | Routine annual maintenance and light dirt buildup |
| Professional Tune-Up | $80 – $160 | 45 to 60 Minutes | Annual electrical diagnostics and basic exterior rinsing |
| Pro Deep Chemical Wash | $225 – $450 | 2 to 3 Hours | Neglected units, heavy grease, or pulled indoor A-coils |
Choosing Your Cleaner: The Chemistry Matters
Choosing the wrong chemical can strip away factory protective layers and corrode your metal coils within months.
Acidic (pH 1–3)
Hydrofluoric Acid
- Eats aluminum fins
- Voids warranties
Neutral (pH 7–8)
Mild Dish Soap / No-Rinse
- Safe for microchannels & indoor
- Zero metal loss
High Alkaline (pH 11–13)
Potassium Hydroxide
- Removes heavy industrial grease
- Eats microchannel tubes if unrinsed
Why You Must Avoid Acid-Based Cleaners
Acidic cleaners containing hydrofluoric acid brighten coils by literally melting away the exterior surface layer of aluminum. While the metal looks brand-new and shiny afterward, repeated acid treatments thin the fins, cause premature pinhole leaks, and void your manufacturer warranty. Professional HVAC technicians avoid harsh acid brighteners on residential equipment.
High-Alkaline Foaming Cleaners (pH 11 to 13)
Alkaline foaming cleaners work wonders on traditional outdoor copper-and-aluminum coils. The chemical foam expands between the fins, lifting compacted soil, road film, and insect residue out to the surface. However, you must rinse alkaline chemicals off completely within ten minutes so they do not cause surface etching. Never leave alkaline residue sitting on microchannel coils.
pH-Neutral and Self-Rinsing Cleaners (pH 7.0 to 8.0)
Neutral cleaners offer the safest chemistry for any coil style. These formulas loosen everyday dust, light oils, and pollen without attacking raw aluminum or copper joints. Use self-rinsing neutral foam cleaners for all indoor evaporator coils where water rinsing is impractical.
Can You Use Dawn Dish Soap Instead?
If you do not want to spend money on specialty chemicals for light seasonal maintenance, regular Dawn dish soap works surprisingly well. Mix two tablespoons of dish soap into a gallon of warm water, pour it into an ordinary garden pump sprayer, and saturate the fins. Dish soap cuts through light grease, leaves zero caustic residue, and will never harm your equipment.
Safety Protocols: Respecting High-Voltage Current
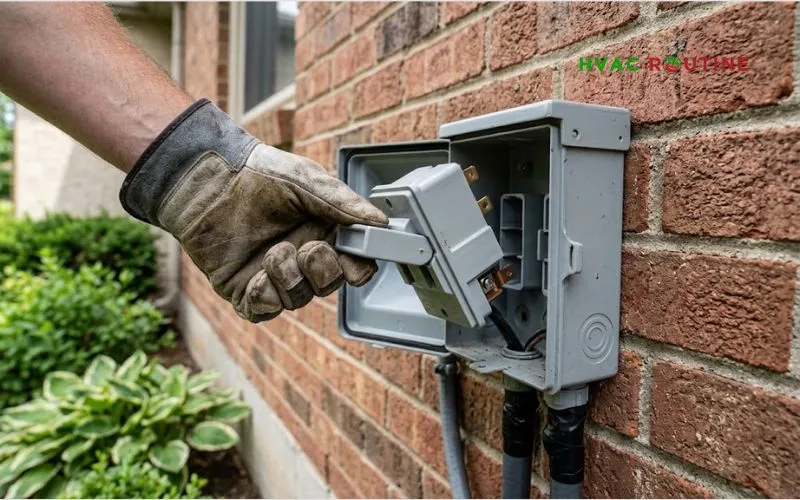
Air conditioners run on high-voltage 240-volt circuits that present genuine shock hazards. Never touch an internal component without completing this safety routine first.
DANGER: High-Voltage Capacitor Charge Warning
Flipping your household circuit breaker cuts wall current, but it does not drain the dual-run capacitor inside the outdoor control panel. That silver, oval capacitor stores a dangerous charge of 370 to 440 volts for hours after shutdown. Keep the metal electrical service door tightly screwed shut while washing your coils, and never poke wet tools or bare hands into the wiring compartment.
1. Clear the Disconnect Box (And Watch for Wasps)
Before you touch the outdoor disconnect box, tap the metal cover lightly with the plastic handle of a screwdriver. Mud daubers and paper wasps love nesting inside these warm, dry electrical enclosures during the spring.
Open the door and pull the disconnect block straight out of its socket, or flip the heavy-duty switch to the OFF position. Turn the pullout block upside down and close the metal door.
2. Kill the Indoor Breaker
Head inside to your main electrical panel and switch off the dedicated AC circuit breaker. Cutting power here drops the 24-volt current running to your thermostat and furnace control board, protecting low-voltage fuses from blowing while you work. Walk back to your thermostat and set it to COOL; verify that the outdoor unit stays completely silent.
3. Protect Fragile Copper Lines
Never rest your weight on, tug, or twist the copper refrigerant lines entering your indoor coil or outdoor cabinet. Kinking soft copper tubing chokes refrigerant flow, starves your compressor of oil, and requires an expensive line-set repair.
How to Clean AC Coils on Your Outdoor Condenser (Step-by-Step)
Once your power is fully disconnected, you can disassemble and flush your outdoor unit.
Step 1: Remove the Top Fan Assembly
Do yourself a big favor: grab an old coffee mug or a magnetic parts tray before backing out the screws holding the top fan grille. Dropping a 5/16-inch hex screw into thick lawn turf will turn a quick project into an afternoon scavenger hunt.
Back out the perimeter screws and lift the fan assembly straight up. Be careful not to strain the black and yellow motor wires. Instead of letting the heavy fan motor hang by its wiring harness, tilt the fan assembly and rest it securely across the top corner of the metal cabinet, or support it with a short bungee cord.
Step 2: Clear Out Deep Debris
Reach into the bottom of the empty metal cabinet with gloved hands. You will likely find a damp compost pile of rotten leaves, twigs, and dead insects resting on the metal floor.
Pull the heavy muck out by hand, then vacuum the remaining dirt and gravel using your wet/dry shop vacuum. Take a screwdriver and poke through the small weep holes around the edge of the base pan to make sure rainwater drains freely instead of rusting out the cabinet floor.
Step 3: Spray Your Cleaning Solution
Spray your foaming coil cleaner or soapy water mixture generously across the exterior aluminum fins. Start at the bottom and work your way upward so the expanding foam lifts dirt up and out.
Let the cleaner sit on the metal for seven to ten minutes so it can break down greasy road film. You will see the chemical foam bubble up, carrying dark sediment with it.
Step 4: Rinse the Fins from the Inside Out
Never point a high-pressure washer at an air conditioner. A pressure washer will instantly fold paper-thin aluminum fins flat, choking airflow and ruining the coil.
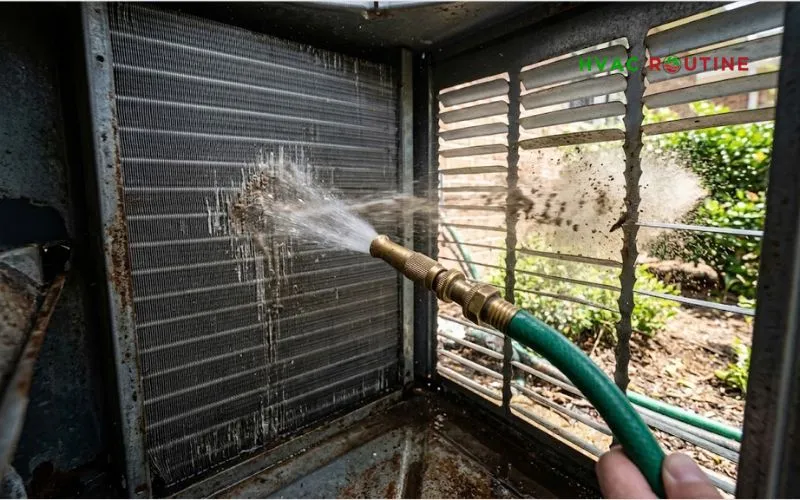
Instead, step up to the open cabinet and point a standard garden hose from the inside outward. Flushing from the inside out pushes dirt backward along the path it entered, rather than cramming it deeper into the center of the coil. Rinse patiently until clear water pours out onto your grass.
Step 5: Straighten Crushed Metal Fins
If you have a standard tube-and-fin system, look closely for bent spots caused by hail or stray rocks. If this is your first time using an HVAC fin comb, work slowly. Those thin aluminum fins bend easily, but they are surprisingly forgiving if you use light, steady pressure.
Find the comb head that matches your coil’s fin count per inch. Insert the teeth into an undamaged section of the coil just below the crushed area, and gently comb upward in straight vertical strokes. Straightening these bent channels restores proper airflow and takes stress off your fan motor.
Can You Clean Condenser Coils Without Taking the Cabinet Apart?
If you are pressed for time, you can perform an exterior surface rinse without pulling off the top fan.
Pull the outdoor electrical disconnect handle first. Brush away grass clippings and dried cobwebs from the outer louvers with a stiff nylon brush. Spray foaming coil cleaner directly through the metal grille slats, let it dwell for ten minutes, and wash it out using a downward-angled garden hose nozzle.
Keep in mind that this shortcut cleans only the outer surface of the metal. Fine silt and pollen will still sit trapped deep in the interior core, so plan for a full teardown and inside-out flush every other year.
Indoor Evaporator Coil Cleaning: Taming the A-Coil
Indoor coils demand a cleaner, more controlled touch since you are working inside a finished living area, attic, or utility closet.
Step 1: Open the Air Handler Access Panel
Locate the sheet-metal access panel on the supply plenum directly above or below your furnace. Back out the 1/4-inch hex screws securing the metal door.
If previous installers sealed the cabinet seams with shiny foil tape, slice through the tape gently with a utility knife. Keep your blade shallow—you do not want to slice into the soft copper lines or plastic drain lines hidden just behind the sheet metal. Slide the metal access panel away to reveal the triangular A-frame coil.
Step 2: Dry-Brush Lint and Dust Bunnies
Take a good look at the underside of the triangular coil where return air enters. This surface usually traps a felt-like mat of lint, pet hair, and carpet fibers.
Run a soft-bristle nylon brush gently down the fins to peel this mat away. Hold your vacuum nozzle right next to your brush to swallow the dust before it falls down into your furnace heat exchanger. Never scrub horizontally across the fins, as scrubbing sideways folds the delicate metal edges shut.
Step 3: Apply Self-Rinsing No-Rinse Cleaner
Shake your can of self-rinsing evaporator cleaner and coat all sides of the indoor coil thoroughly. Make sure to spray deep into the triangular center channel of the A-frame.
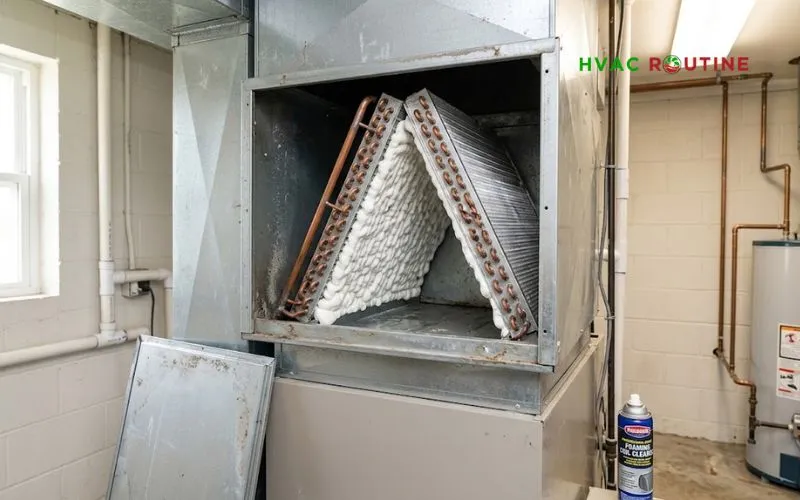
This specialized formula requires zero manual water rinsing. When you turn your air conditioning back on, moisture from indoor air condenses on the cold metal, creating a steady stream of water that washes the foam and dissolved dirt straight into the plastic drain pan.
Step 4: Eliminate “Dirty Sock Syndrome” and Clear the Drain
If your vents release a damp, locker-room stench every time the AC kicks on, you are dealing with “Dirty Sock Syndrome”—bacterial colonies growing on moist indoor fins. Spray an EPA-registered HVAC disinfectant or coil biocide across the fins to destroy this bacterial biofilm.
Next, pour a mixture of warm water and one cup of distilled white vinegar directly into the plastic condensate pan. Vinegar cuts through algae slime and keeps your PVC exit pipe clear.
Head outside to where the PVC pipe exits your home and slide your wet/dry vacuum hose over the pipe opening. Wrap an old damp rag around the connection to build a tight suction seal, and run the vacuum for two minutes. You will be amazed at the thick, gelatinous sludge that pulls free.
Cleaning Ductless Mini-Split Coils
Mini-split systems pack delicate cooling fins into sleek, wall-mounted air handlers.
Lift open the front plastic cover and pull out the washable mesh air filters. Take these filters to your sink and rinse them under warm water with a drop of liquid dish soap.
Vacuum the tiny aluminum coil face behind the filters using your vacuum’s soft brush attachment, then mist the coil lightly with self-rinsing cleaner.
Look up into the lower air louvers with a flashlight to inspect the cylindrical, barrel-shaped blower wheel. If you spot thick black dust or mold on the wheel blades, wipe them down with a damp microfiber cloth to restore airflow speed.
Safe Drying Times Before Restoring Power
Never rush to flip high-voltage electrical breakers back on while components are wet.
Give your outdoor condenser unit thirty to forty-five minutes to air-dry in the sun after rinsing. Take a dry shop rag and wipe away any stray water splashes from the outside of the electrical service cabinet. Indoor evaporator coils need only ten to fifteen minutes of settling time after spraying self-rinsing foam.
Once you confirm that all electrical enclosures and wiring harnesses are completely dry, reinsert your outdoor disconnect block, flip the indoor breaker back on, and drop your thermostat setting to test the system.
Measuring Your Results: The Delta-T Temperature Split
Do not rely on gut feeling to judge your work. You can confirm your performance gains by calculating the Delta-T temperature drop across your cooling system. Grab a simple digital cooking probe or an instant-read HVAC thermometer.
Delta-T (Temperature Split) Airflow Workflow
Insert your probe into the return air duct directly before the air filter and record the temperature. Next, push the probe into the supply register closest to your indoor air handler and note that reading.
Subtract the supply temperature from the return temperature to get your Delta-T. For example, if your return air reads 76°F and your supply vent reads 58°F, your system is producing an 18°F drop.
The Air-Conditioning, Heating, and Refrigeration Institute notes that healthy residential systems generate a temperature split between 16°F and 20°F under normal indoor humidity. If your reading sits below 14°F after cleaning, you may have duct leaks, a failing blower motor, or low refrigerant levels.
Troubleshooting Post-Cleaning Glitches
If your system runs into issues after you power it back up, check these common trouble spots:
Water Overflows the Indoor Drain Pan
Loose dirt or dislodged biological slime can slide into the drain hole during cleaning and cause a backup. Shut the system off immediately to prevent water damage to your ceilings. Clear the drain trap with your shop vacuum and verify that your safety float switch moves freely.
The Outdoor Fan Shakes or Rattles Loudly
An unbalanced fan blade creates loud, shaking vibrations throughout the cabinet. Check whether you tightened down every motor mounting bolt securely during reassembly. Also, inspect the fan blades to ensure wet yard debris did not stick to one side of a blade, throwing off its rotational balance.
How to Winterize Your Outdoor Condenser the Right Way
Many well-meaning homeowners accidentally damage their outdoor condensing units when trying to winterize them. Never wrap your outdoor unit in a solid plastic tarp or elastic slipcover.
A sealed plastic cover traps ground moisture inside the cabinet, creating a humid terrarium that rusts fan bearings and corrodes copper tubes. Full covers also invite mice and squirrels to chew on wiring during freezing weather.
Instead, protect only the top exhaust grille. Cut a piece of 3/4-inch exterior-grade plywood to fit the top dimensions of your condenser. Lay the wood across the top fan guard and weigh it down with a single cinder block.
This simple cover keeps falling icicles, heavy snow, and pine needles from dropping into the cabinet while leaving all four side grilles open. Fresh air will circulate freely, keeping the internal metal completely dry all winter.
Frequently Asked Questions About Cleaning AC Coils
Can I use Dawn dish soap to clean my AC coils?
Yes, mild Dawn dish soap mixed with warm water works well on outdoor condenser coils with light road grime. Rinse the soap off thoroughly with a gentle garden hose to prevent dried film buildup.
Can I clean AC coils without taking the unit apart?
Yes, you can spray foaming cleaner through the outer cabinet louvers and rinse it out with an angled hose nozzle. This shortcut cleans only surface dirt, so you should still perform a complete interior flush every two years.
How long should I wait before turning the AC back on?
Wait thirty to forty-five minutes after washing outdoor coils to let electrical cabinets and fan motor housings dry. Indoor evaporator coils require only ten to fifteen minutes before you restore electrical power.
How often should AC coils be cleaned?
Clean your outdoor condenser coil once every spring before hot summer weather sets in. Inspect and treat your indoor evaporator coil every twelve to twenty-four months depending on household pet dander levels.
What happens if I never clean my AC coils?
Uncleaned coils force your compressor to run under high head pressure, which drives up energy consumption by twenty to thirty percent. Over time, poor heat exchange leads to frozen evaporator lines and total compressor failure.
When to Put Down the Tools and Call a Pro
While routine cleaning is a straightforward DIY task, some situations require specialized EPA certification, diagnostic manifold gauges, and professional tools.
Call a licensed technician if you discover solid ice building across your evaporator tubes. Ice points to low refrigerant charges or failed blower motors rather than simple dust buildup.
Call an expert if you spot dark, oily stains around copper joints. That oil indicates refrigerant is escaping through a cracked solder weld. Finally, call a pro if your furnace features a fully welded sheet-metal plenum without an access door. Cutting into uncased plenums without puncturing copper tubing requires professional sheet-metal shears and recovery gear.
Smart Maintenance Habits for Lower Summer Energy Bills
Keeping your cooling coils clean gives you direct control over your indoor comfort and summer power bills. Rinse your outdoor unit every spring, inspect your indoor coil every two years, and change standard one-inch pleated air filters every sixty days during the cooling season.
Maintain at least two feet of clear perimeter space around your outdoor unit by trimming back hedges, clearing mulch, and aiming lawn mower discharge away from the metal fins. These simple, low-cost habits protect your compressor, lower your monthly bills, and keep your home cool and comfortable through the hottest days of the year.