⏱️ Estimated Reading Time: 14 min read👁️ Viewed 49 times
Nothing ruins a sweltering July afternoon quite like an air conditioner that wheezes out lukewarm, stale air. You drop the thermostat to sixty-eight degrees, yet the bedroom stays sticky and damp while the compressor grinds away loudly in the window frame. A choked machine works twice as hard, pulls heavy electrical current, and drives up your monthly utility bill. Learning how to clean a window AC unit restores peak cooling power, cuts your electric bill, and protects your indoor air quality. With a few basic supplies and an afternoon of focused work, you can clear out months of built-up grime and breathe fresh, ice-cold air again.
Project Overview
Active Work Time: 60 to 90 minutes
Drying Time: 12 to 24 hours
Difficulty Level: Intermediate (requires lifting heavy equipment)
DIY Cost: $15 to $30 (reusable cleaner, brushes, and fin comb)
Dust and pet hair accumulate quietly over the cooling season. Use this preventive schedule to keep air moving smoothly through your heat exchangers before clogs form:
Component
Cleaning Frequency
Maintenance Action
Time Required
Nylon Air Filter
Every 2 to 4 weeks
Wash with warm water and liquid dish soap
10 minutes
Front Grille and Louvers
Monthly
Wipe with microfiber cloth and vacuum dust
5 minutes
Evaporator Coils
Start of cooling season
Apply foaming no-rinse coil spray
20 minutes
Condenser and Blower Wheel
Annually (Deep clean)
Remove cabinet and wash outdoors
90 minutes
Drain Pan and Weep Holes
Twice per season
Clear debris and flush with peroxide
15 minutes
Window Air Conditioner Maintenance Costs, Safety, and Tools
Hiring an HVAC technician for a small room unit rarely makes financial sense. Service calls quickly exceed what the air conditioner is worth, while taking the DIY route keeps cash in your wallet and delivers identical cooling results.
Service Feature
DIY Cleaning
Professional HVAC Service
Average Cost
$15 – $30 (reusable supplies)
$100 – $180 (single visit)
Turnaround Time
Immediate (same afternoon)
2 to 5 business days wait time
Control Over Parts
Careful hand-washing
Fast chemical spraying
Long-Term Savings
High (tools last for years)
Low (repeats every season)
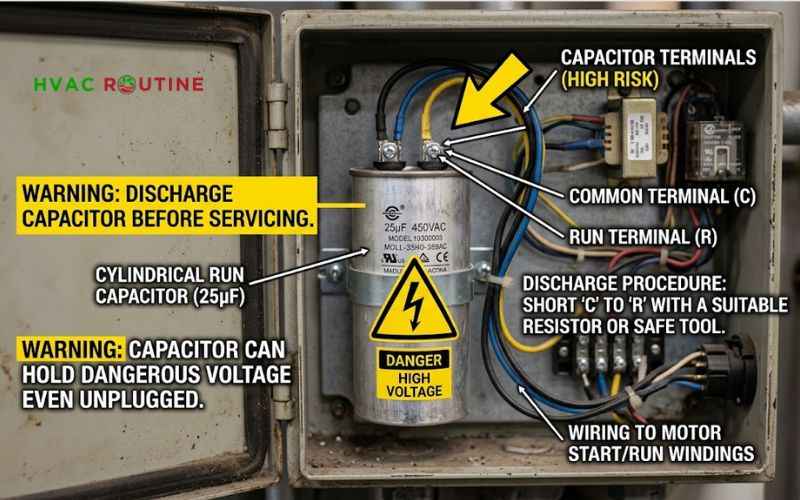
Always prioritize safety before loosening a single screw on the frame. Unplug the 120-volt power cord from the wall outlet before touching any metal surfaces. Keep AC capacitor electrical safety in mind: the internal run capacitor stores high-voltage current long after you pull the wall plug. Never bridge capacitor terminals with bare fingers or uninsulated screwdrivers.
Wear cut-resistant work gloves throughout the entire job. Aluminum heat-exchange fins look harmless, but they slice knuckles like fresh razor blades if your hand slips. Put on safety glasses to shield your eyes from chemical splashes and dislodged debris.
Chemical Safety and Protecting Factory Coatings
Manufacturers apply a thin, hydrophilic blue coating across aluminum coil fins to shed condensation and resist corrosion. Harsh acidic or heavy caustic degreasers strip this factory layer away, leaving bare metal vulnerable to rapid oxidation.
Never mix chlorine bleach with vinegar or ammonia under any circumstances. Combining bleach and vinegar creates toxic chlorine gas that damages your lungs and degrades plastic components inside the chassis. Stick to mild liquid dish soap, three percent hydrogen peroxide, and EPA-registered, self-rinsing foaming sprays.
A window AC run capacitor inside the metal control box with electrical safety warning callout
Gather these supplies before you begin:
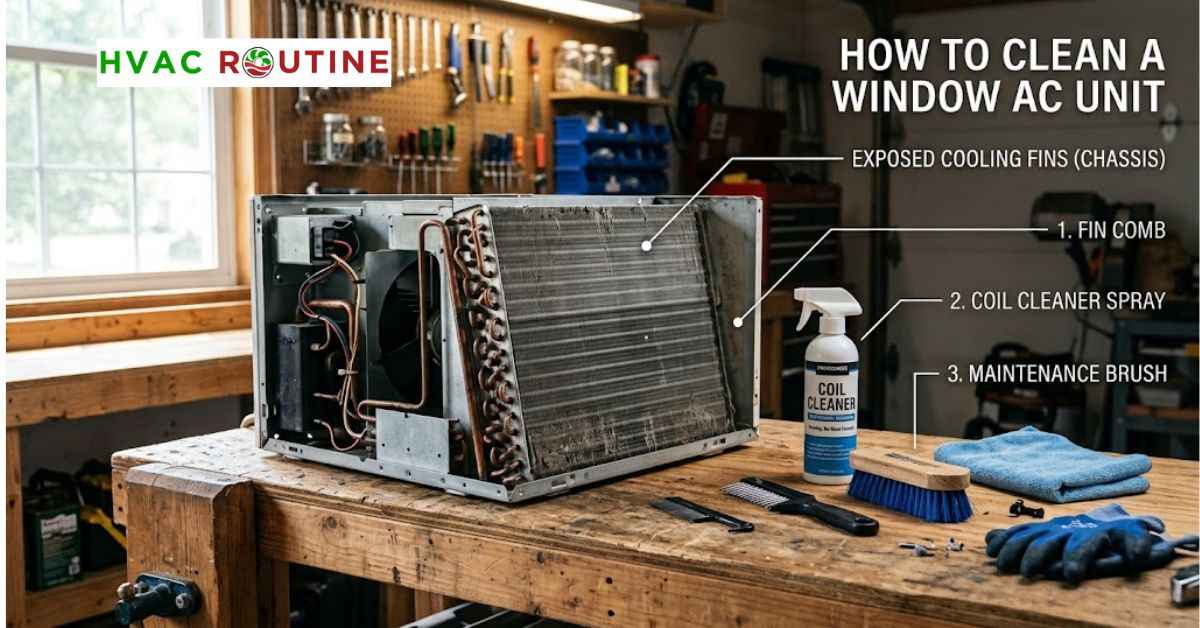
A can of no-rinse foaming condenser cleaner and evaporator coil cleaner spray.
A nylon fin comb set to straighten bent metal air passages.
A Phillips screwdriver, a flathead screwdriver, and a narrow wire brush.
A spray bottle filled with warm water and two tablespoons of mild liquid dish soap.
Three percent hydrogen peroxide or distilled white vinegar for mold removal.
Three clean microfiber towels and a shop vacuum with a brush attachment.
Clean Window AC Without Removing It or Deep Clean Outdoors?
You do not always need to wrestle an eighty-pound machine out of the window frame. A quick, in-place surface cleaning works wonders once a month during peak summer. Slide out the front nylon screen, rinse it clean under the kitchen tap, and vacuum loose pet hair off the face of the front coil. You can clean window AC without removing it whenever you only need to clear light surface dust and freshen airflow. A light mist of self-rinsing coil cleaner directly onto the front fins takes care of mid-season buildup without any heavy lifting.
However, pull the machine outside for a deep clean if you notice a sour odor, see thick grime on the blower fan, or find stagnant black sludge in the bottom tray. Flushing out caked mud and organic buildup requires open drainage where running water will not ruin your floors.
The Apartment Workaround: Cleaning Indoors Without a Yard
Living on an upper floor without a backyard or driveway should not stop you from giving your air conditioner a thorough wash. You can complete a seasonal teardown right inside your bathroom.
Carry the stripped chassis into the bathroom and set it directly inside your bathtub. Lay two thick rubber bath mats or scrap wood blocks under the unit to prevent the metal corners from scratching your tub enamel. Fasten a waterproof AC cleaning bib around the outer casing to direct runoff straight down the drain. Rinse the rear coils using a hand-held shower wand on low pressure, or use a two-gallon hand-pump garden sprayer for better water control. Once finished, use a wet-dry shop vacuum to pull standing puddles out of the base pan before carrying the chassis back to the window.
How to Clean a Window AC Unit: The Step-by-Step Process
Set aside a quiet afternoon and follow these steps to clean your cooling system from the inside out.
Step 1: Safely Unmount the Machine
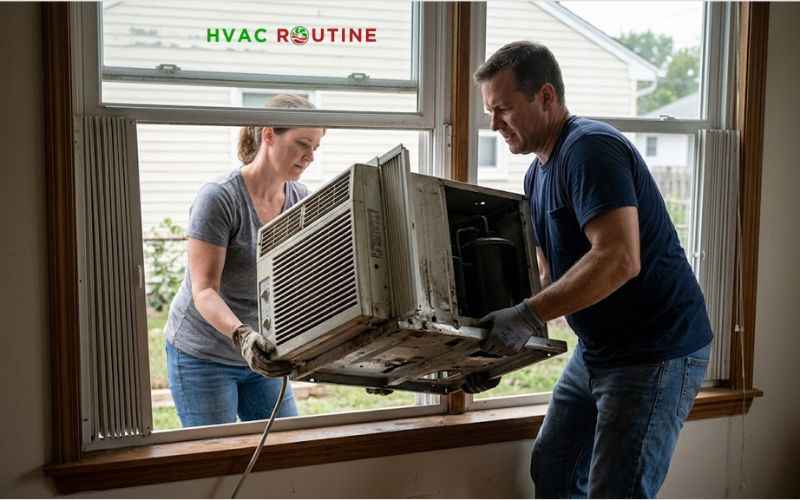
Always ask a partner to help you lift the unit. Room air conditioners concentrate most of their weight in the back corner where the iron compressor sits, making them awkward and unbalanced to hold alone. Back out the mounting screws along the window sash, slide the accordion side panels inward, and carefully lift the unit onto an outdoor workbench or a pair of sturdy sawhorses.
A heavy window air conditioner is lifting.
Step 2: Strip the Front Grille and Metal Cabinet
Pry the plastic front faceplate off the chassis and set the mesh air filter aside. Remove the perimeter sheet-metal screws that secure the outer metal cover to the bottom tray. Keep a small magnetic tray nearby for your screws; hunting through the grass for a dropped screw adds unnecessary frustration to your afternoon. Slide the metal housing straight back off the frame to expose the fan motor, tubing, and coils.
Handling Modern U-Shaped and Bracket Units
Modern U-shaped inverter models isolate the noisy compressor outside by running a narrow saddle channel across the window sill. Unhook the indoor anti-tip safety brackets first. Unscrew the plastic wire conduit running through the center bridge and unclip the ribbon cable that connects the front display to the main inverter power board. Separate the indoor fan section from the center channel before trying to lift the outdoor casing. Never force the two halves apart, or you risk kinking the copper refrigerant lines buried inside the central bridge.
Step 3: Shield Sensitive Circuit Boards and Sensors
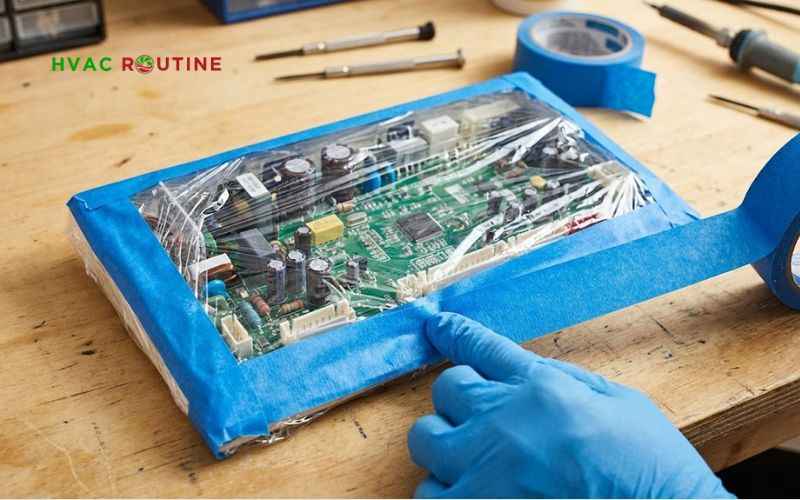
Modern air conditioners rely on sensitive microprocessors that short out instantly if exposed to moisture. Wrap the main electrical box, wiring bundles, and circuit boards in heavy plastic freezer bags, sealing the edges tightly with painter’s tape.
Pay close attention to the ambient temperature sensor, which looks like a small copper bulb clipped directly in front of the indoor evaporator coil. Carefully unclip this sensor and wrap it inside your waterproof cover. Take a soft microfiber cloth and gently wipe off any caked dust so the sensor can read room temperatures accurately once reinstalled.
Window AC printed circuit board and wiring wrapped securely in plastic wrap and waterproof painter’s tape
Step 4: Degrease and Rinse the Coils
Indoor evaporator fins catch household dust and kitchen grease, while outdoor condenser coils collect road grime, dirt, and cottonwood fuzz. Use a soft nylon brush to sweep away loose surface lint using gentle, upward strokes along the metal channels.
Coat the indoor evaporator coil with an even layer of foaming cleaner and let it sit for fifteen minutes. The expanding foam lifts trapped grease and sticky dirt to the surface. Wipe the face clean with a damp microfiber cloth.
Next, spray heavy-duty coil cleaner across the outdoor condenser coil at the rear of the machine. Rinse the condenser thoroughly from the inside out with a low-pressure garden hose nozzle to push the dirt back out the way it entered. Never use a high-pressure washer; intense water jets flatten soft aluminum fins in seconds and choke your airflow permanently.
Step 5: Clean the Blower Wheel and Fan Blades
The cylindrical squirrel-cage blower wheel pulls chilled air through your living space. Moisture and fine dust combine inside this housing to form a thick, greasy paste along the fan blades that cuts airflow significantly.
Scrubbing between dozens of narrow plastic fins with an old toothbrush and warm, soapy water takes patience, but it restores quiet, powerful airflow better than almost anything else you can do. Once the blower wheel is clean, wipe down the outdoor propeller blades with a microfiber cloth and spin the fan shaft by hand to verify that the assembly turns silently without rubbing the housing.
Step 6: Clear Styrofoam Mold and Flush the Drain Pan
Dark mildew patches frequently grow across the damp styrofoam air dividers inside the blower compartment. Fill a spray bottle with three percent hydrogen peroxide or distilled white vinegar and spray the affected foam surfaces generously. Let the solution sit for ten minutes, then wipe the foam clean with a soft rag. Avoid bleach or strong chemical solvents here, as bleach oxidizes aluminum and solvents melt molded polystyrene foam on contact.
Move to the base pan and clear out dead leaves, mud deposits, and algae using your shop vacuum. Take a wooden skewer or pipe cleaner to clear the small weep channels along the rear corners of the metal pan so pooled water drains properly during heavy rain.
Step 7: Straighten Bent Fins with a Fin Comb
Crushed cooling fins restrict air movement and force the compressor to run longer cycles. Count the number of aluminum fins per inch on your coil face to select the matching comb head from your tool set. Insert the teeth into a straight section of fins just below the damaged spot, then pull the tool upward with steady, gentle pressure to restore the original air gaps.
Reassembly and Post-Cleaning Electrical Checks
Give your air conditioner plenty of time to dry before restoring power. Let the machine sit in a warm, breezy outdoor spot for twelve to twenty-four hours. Moisture trapped inside wire harnesses or terminal boots can easily blow a fuse, trip your circuit breaker, or short out the fan motor.
Once dry, slide the metal cabinet back over the chassis and tighten all mounting screws securely. Snap the temperature sensor bulb back into its plastic bracket on the front coil face. Make sure the metal bulb rests in open air without touching the aluminum fins directly; direct metal contact causes the sensor to read freezing coil temperatures and shut the compressor off prematurely.
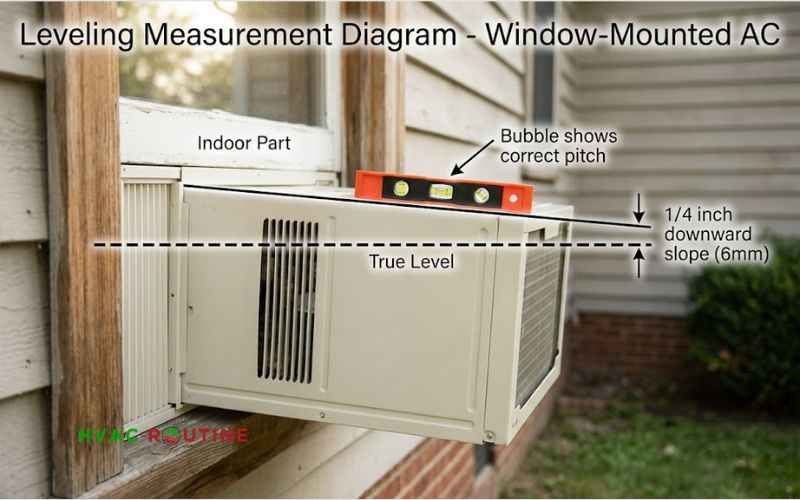
Reinstall the machine in your window with a slight quarter-inch tilt toward the outdoors so condensation runs toward the back instead of spilling onto your indoor sill.
Side view diagram of a window AC unit installed with a 14-inch backward tilt toward the outside for water drainage
What to Do If the LCDI Safety Plug Trips
Every modern room air conditioner uses a Leakage Current Detection and Interrupter (LCDI) module built right into the power cord plug. After plugging the cord into the wall outlet, press the blue or gray “Reset” button until it clicks into place.
Do not panic if the plug trips off the moment you restore power. This usually means a trace amount of moisture remains inside a terminal connection. Unplug the cord, remove the electrical inspection panel, and run a hair dryer on its cool setting over the wire connections for ten minutes. Plug the machine back in, press the reset button again, and the unit should power on smoothly.
Post-Cleaning Troubleshooting Guide
If your air conditioner acts up after you put it back together, check this quick troubleshooting guide before spending money on a service technician:
Symptom
Probable Cause
Immediate Fix
No power (Display stays dark)
LCDI plug tripped or damp wire harness
Dry terminals with cool air and press “Reset” on plug body
Water drips down interior wall
Unit tilted forward toward the room
Adjust mounting bracket to provide a 1/4-inch backward tilt
Coils freeze into solid ice
Blocked air channels or sensor touching coil
Straighten fins with comb and unclip sensor from aluminum face
Loud rattling or clattering
Debris in fan housing or loose blade
Clear stray twigs and tighten blower wheel set screw
Compressor hums but will not start
Weak run capacitor or low line voltage
Unplug unit and call a technician to test capacitor capacitance
Inverter Window AC Maintenance: Protecting High-Tech Parts
Modern variable-speed inverter air conditioners save substantial energy by adjusting motor speed smoothly instead of cycling roughly on and off. However, these advanced units require extra care around high-voltage power converters.
Never spray water near the secondary inverter driver board mounted beside the compressor dome. Wipe down external Wi-Fi antennas and ambient humidity sensors using a dry micro-static cloth. Clean, unobstructed airflow keeps these smart cooling algorithms running within their designed efficiency curves and prevents microprocessors from overheating.
Energy Savings and Off-Season Storage Care
The Association of Home Appliance Manufacturers measures room cooling performance through the Combined Energy Efficiency Ratio (CEER). Dirt-choked coils force the compressor to pull high electrical amperage for extended cycles. The United States Department of Energy notes that routine coil and filter maintenance reduces air conditioner power consumption by five to fifteen percent. On a hard-working 10,000 BTU unit cooling a sunny living room, clean coils easily save twenty-five dollars a month on summer electric bills while preventing the evaporator from freezing up under load.
Winterizing and Off-Season Storage
Leaving your air conditioner mounted in the window throughout cold winter months damages internal gaskets and creates massive home heat leaks. Cold drafts enter through the thin accordion side panels, driving up your winter heating bill significantly.
Remove the machine in late autumn and run it on “Fan Only” mode for an hour to dry out interior foam pockets completely. Storing a damp unit in a dark closet invites mold growth and attracts nesting mice. Store the dry machine upright in a heated basement, spare room, or garage. If local apartment regulations require you to leave the machine mounted in the window year-round, install a heavy-duty, insulated vinyl exterior cover and seal the side panels with dense foam weatherstripping to block winter drafts.
Real Reader Questions and Expert Answers
Why does my window unit smell like vinegar or dirty socks?
Bacterial micro-colonies and mildew feed on trapped pet dander, skin cells, and household dust stuck to damp evaporator fins. When the blower fan kicks on, it pushes these volatile organic compounds straight into your room. An air conditioner running in a humid space without clean coils can develop this unpleasant odor in just a few weeks. Spray the coils and base pan with three percent hydrogen peroxide to kill the odor-causing bacteria at the source.
Should I drill a drain hole in the bottom pan to stop water pooling?
Never drill a drainage hole through the bottom metal tray of a modern room air conditioner. Engineers specifically design the outdoor fan with an outer plastic slinger ring that scoops up condensation and splashes it directly against the hot condenser coils. This splashing action evaporates the water rapidly and helps cool the hot refrigerant lines faster. Drilling into the bottom pan ruins this engineered cooling cycle and carries a high risk of puncturing a hidden copper line, which destroys the air conditioner instantly.
Can you hose down a window AC unit while it is running?
Never spray water into an air conditioner while electrical current flows through the machine. High-voltage circuits mixed with running water present an immediate shock hazard and can easily burn out the control board. Always turn the system off, disconnect the wall plug, and let the internal components dry completely before restoring power.
Simple Habits for Cold Air All Summer
Keeping your air conditioner clean does not take special mechanical skills—just a little patience and the right routine. Rinse the front nylon filter in warm water every two weeks during the summer to trap dust before it ever reaches the aluminum coils. Taking the time to wash your window unit thoroughly once a year protects your indoor air, keeps your electric bills low, and prevents sudden breakdowns right in the middle of a heat wave. Pack the clean, dry machine away when autumn arrives, and you will enjoy quiet, ice-cold air the very first warm afternoon next spring.
MD Thouhidul Islam is an HVAC/R specialist holding a Diploma in Electrical Engineering and professional certification in Air Conditioning and Refrigeration. With over 3 years of hands-on field experience, he specializes in electrical diagnostics, system maintenance, and component-level repairs.