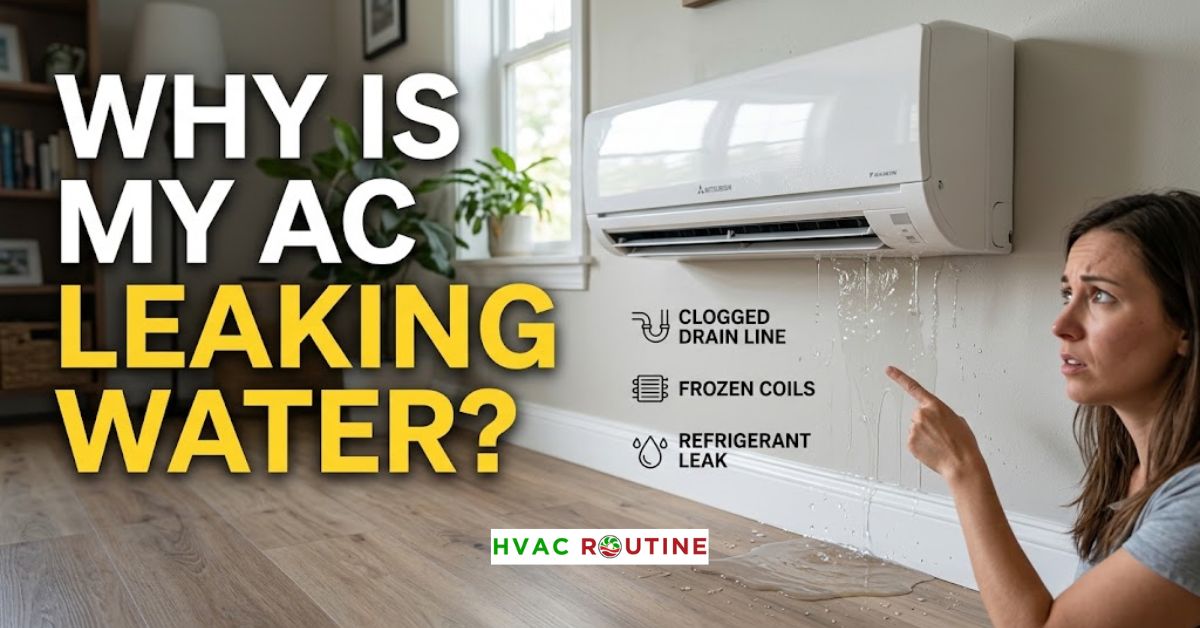
You walk down the hallway on a sweltering July afternoon, and your bare foot steps right into a soaking wet carpet. You look up, dreading what you might see, and find a dark water ring spreading across your ceiling drywall.
Your mind races straight to one question: why is my AC leaking water?
An air conditioner leaks water when something blocks its natural drainage flow, when frozen coils thaw too quickly, or when old catch pans corrode. Most indoor puddles trace back to a clogged condensate drain line, a choked air filter, or an unlevel unit. You must shut down the system immediately to protect your home from ceiling collapses, warped floorboards, and toxic mold growth. Pinpointing the root cause of why is my AC leaking water transforms what feels like a plumbing disaster into a manageable afternoon fix.
What You'll Learn ⭐⭐⭐⭐⭐
- Emergency First Steps: Stop the Leak Immediately
- Why Is My AC Leaking Water? The 6 Primary Mechanical Culprits
- NORMAL CONDENSATION CYCLE
- AC Condensate Drain Line Clogged: The Primary Offender
- INSIDE THE CLOGGED DRAIN LINE
- Warning: Water Dripping From the Pipe Outside Above Your Window
- ROOF SOFFIT DRAIN ALERT
- Sweating Copper Refrigerant Lines: Damaged Suction Insulation
- Window AC Water Leaks: Incorrect Pitch and Drain Plug Confusion
- WINDOW AC PITCH: INDOOR LEAK VS. OUTDOOR DRAINAGE
- Frozen Evaporator Coil Thawing and Airflow Problems
- THE COIL FREEZE CHAIN
- Why Is Your Ductless Mini-Split Leaking Water?
- MINI-SPLIT WALL UNIT CROSS-SECTION
- Foul Odors and Water: Treating Dirty Sock Syndrome
- Is Leaking AC Water Toxic or Mixed With Refrigerant?
- CONDENSATE SAFETY FACTS
- Building Codes and Safety Standards: IRC and IMC
- The True Financial Cost of Neglecting an AC Water Leak
- Will Homeowners Insurance Cover AC Water Damage?
- INSURANCE COVERAGE DETERMINATION
- Diagnostic Checklist: Identify Your Leak in Minutes
- Overlooked Technical Reasons Your AC Leaks
- P-TRAP DRAINAGE: NEGATIVE PRESSURE VS. PROPER FLOW
- Tools and Safety Supplies for DIY Troubleshooting
- When to Call a Licensed HVAC Professional
- Typical HVAC Repair Price Ranges
- Smart Tech Upgrades to Prevent Future Water Damage
- EARLY LEAK DETECTION SETUP
- Common Air Conditioner Leak Questions Answered
- Seasonal Action Plan: Keep Your Drain Lines Clear
Emergency First Steps: Stop the Leak Immediately
Before you reach for a wrench or take off an access panel, you need to halt active water production. Water travels fast through floor joists and insulation, so work through these three actions right away:
- Shut down cooling at the thermostat. Slide your system switch from “Cool” to “Off”. Leaving the blower running while water backs up pushes moisture directly into your ductwork and spreads humidity through your vents.
- Flip the breaker in your main electrical panel. Find the breaker labeled for your indoor air handler or furnace and switch it completely off. Cutting high-voltage electricity eliminates shock hazards and shields your sensitive control board from short-circuiting.
- Mop up standing water immediately. Grab a wet-dry shop vacuum, an old towel pile, and a bucket. Soak up every bit of moisture resting on your floor or attic decking. According to Environmental Protection Agency guidelines, drywall and wood framing begin growing microbial mold within 24 to 48 hours of soaking.
Why Is My AC Leaking Water? The 6 Primary Mechanical Culprits
Your cooling system does not actually produce cold air out of thin air. Instead, it extracts heat and humidity from your indoor air as that air glides across a freezing cold evaporator coil.
As that moisture condenses on the metal coil fins, gravity pulls the droplets down into a primary drain pan. From there, the water travels out of your home through a dedicated three-quarter-inch PVC pipe. When any link in that drainage chain breaks, water dumps straight into your living space.
Field Note from a Tech:“Nine times out of ten, when I get a summer call for water pouring through an upstairs ceiling, the system itself is mechanically fine. The homeowner simply ran a basic pleated filter for six months until the drain backed up with slime. Regular cleanings spare you thousands in drywall work.”
AC Condensate Drain Line Clogged: The Primary Offender
A blocked drain line stands as the single most common cause of indoor air conditioner puddles.
Dust, pet dander, and microscopic pollen slip past your air filter and settle inside the damp drain pan. In that warm, pitch-black space, algae and airborne bacteria bloom rapidly. Over a few months of continuous cooling, this mess morphs into a thick, rubbery sludge that plugs the narrow PVC pipe. Water has nowhere left to go, so it fills the pan, creeps over the shallow metal lip, and pools on your floor.
Clearing the Clog With a Shop Vacuum
You can clear this sludge buildup on your own in roughly twenty minutes without spending a dime on service calls:
- Walk outside and find the white PVC drain pipe poking through your home’s exterior foundation near the compressor.
- Wrap a damp rag around your shop vacuum nozzle to create an airtight seal over the mouth of the drain pipe.
- Switch on the vacuum and let it run for three full minutes to dislodge stubborn blockages.
- Pop open the vacuum canister. You will see a nasty collection of murky water, rust flakes, and brown-green jelly.
- Head inside to your air handler and locate the open, T-shaped cleanout port on the PVC line.
- Slowly pour one cup of distilled white vinegar down the cleanout opening to kill off remaining bacterial colonies.
- Wait thirty minutes, then pour two cups of warm tap water down the line to confirm it runs freely to the outside.
What to Do If You Do Not Own a Shop Vacuum
You do not need an expensive garage vacuum to get water moving again. Several household alternatives work just as well for breaking up fresh blockages:
- The Bicycle Hand Pump: Push the rubber hose of a standard tire pump into the indoor T-pipe cleanout. Wrap a wet washcloth around the seam to build a tight seal, and give eight to ten brisk, forceful pumps. That sudden air pressure pops the slime plug right out the far end.
- The Hot Water Gravity Flush: Warm up a quart of tap water on the stove until hot, but stop short of boiling so you avoid softening the PVC pipe joints. Stir in a cup of white vinegar, insert a small funnel into the cleanout port, and pour the mixture in slowly. Let the acidic solution dissolve the algae bonds for forty-five minutes before flushing with fresh water.
- The Flexible Coil Brush: Feed a six-foot nylon drain snake or a flexible refrigerator coil brush directly down into the primary drain port. Twist the snake clockwise as you feed it through to grab hair knots and break apart thick grime rings near the drain mouth.
Warning: Water Dripping From the Pipe Outside Above Your Window
Have you ever spotted water dripping from a mystery pipe poking out of your roof soffit right above a bedroom window? Home builders deliberately run that auxiliary PVC pipe in prominent spots to catch your eye.
That exterior pipe connects directly to the secondary emergency pan sitting underneath your attic air handler. Under normal conditions, that pipe should stay bone dry.
When you see water dripping above your window, your primary indoor drain has completely choked. The primary pan has overflowed, and your emergency pan is actively catching the runoff. Consider that drip an urgent distress signal. If you leave the system running, that secondary catch basin will overflow its shallow two-inch rim next, sending gallons of water crashing through your ceiling plaster. Shut your cooling off the moment you see water leaving that overhead pipe.
Sweating Copper Refrigerant Lines: Damaged Suction Insulation
Sometimes an air conditioner pools water on the floor even when the drain pan and PVC pipe are clear. The culprit often hides along the insulated copper piping running between your indoor coil and outdoor unit.
The thicker copper suction pipe carries cold, low-pressure gas. Because that copper stays cold during operation, it demands a continuous, airtight jacket of black closed-cell foam insulation (commonly called Armaflex). When squirrels or mice chew through the foam, or when old factory glue joints crack open, hot and humid attic air hits that icy copper directly.
The pipe begins sweating profusely, much like an iced drink sitting on a sunny patio. That condensation rolls down the copper tubing, bypasses your drain pan entirely, and drips into your ceiling insulation or down the interior framing studs. Inspect the line set from end to end. If you spot bare metal, purchase split-foam insulation sleeves and heavy-duty foam tape from your local hardware store to seal every exposed inch.
Window AC Water Leaks: Incorrect Pitch and Drain Plug Confusion
Window air conditioners remove remarkable amounts of water from humid rooms, but an improper installation angle will route all that moisture straight into your home.
Setting the Right Angle
Window units depend on gravity to drop water out the back of the metal chassis. You must always mount the exterior casing with a slight downward slope toward your yard—roughly a quarter-inch to a half-inch lower than the front edge.
When you install a unit completely flat or tipped back toward the room, condensation runs toward the front faceplate. The water fills the bottom plastic channel, spills over the indoor lip, and rots your wooden sill and drywall beneath the window. Lay a small torpedo level across the top metal housing to confirm the bubble rests visibly toward the outdoor side.
The Modern Slinger Ring and Drain Plugs
Homeowners often look under their window unit, spot a rubber drain plug, and pull it out thinking they are clearing a clog. Doing this can actually hurt your unit’s performance.
Modern window units use an outdoor fan blade fitted with an integrated plastic rim called a slinger ring. This ring dips into the base pan’s water pool and slaps moisture against the hot condenser coil fins. That splashing water helps cool the mechanical components, boosts efficiency, and evaporates the puddle into the outdoor air.
Never drill drainage holes into the bottom metal pan of a modern window unit. Leave the factory rubber drain plug in place unless extreme, persistent humidity causes the pool to rise so high that water splashes out through the indoor air louvers.
Frozen Evaporator Coil Thawing and Airflow Problems
Seeing solid ice on an air conditioning system in ninety-degree weather always shocks homeowners. Yet when that ice sheet begins to warm up, it releases a wave of water that overwhelms standard drain pans.
What Freezes the Metal?
Your evaporator coil requires steady, warm indoor air moving over its aluminum fins to absorb heat. When a filter packs with dirt, pet fur, and lint, airflow drops down to a faint breeze. Without sufficient heat to absorb, the refrigerant inside the tubing drops below freezing. The moisture condensing on the exterior fins turns into frost, which gradually layers into a thick sheet of solid ice.
Once your thermostat hits its target temperature and shuts the unit down, that ice block melts all at once. The narrow drain port cannot process the sudden volume, and water cascades over the edges of the pan.
If you clean your filter and still find ice on the copper lines, you likely have a refrigerant leak. A tiny pinhole opening drops system pressure, which lowers the boiling point of the chemical and causes the coil to ice over even with clean filters. If your system runs continuously, hisses faintly, and blows lukewarm air, shut it down and schedule an HVAC inspection.
How to Safely Thaw Your System
- Switch your thermostat setting from “Cool” to “Off”.
- Turn the fan setting from “Auto” to “On” so the blower sweeps warm room air across the ice block.
- Pack thick bath towels around the indoor cabinet base to catch water as the ice melts.
- Keep metal tools, screwdrivers, and butter knives away from the coil. Chipping away at ice punctures the delicate aluminum fins and copper lines, turning a simple maintenance fix into a complete coil replacement.
- Give the system two to four hours to thaw out completely before you slide in a fresh filter and restart cooling.
Why Is Your Ductless Mini-Split Leaking Water?
Mini-split wall units mount directly on your drywall, meaning any drainage backup can stain your paint and warp expensive baseboards.
Unlevel Wall Brackets
Mini-split cassettes rely entirely on clean, downward gravity flow. The metal wall bracket supporting the unit must sit level or tilt slightly toward the side where the drain hose exits the wall. If an installer angled the unit back toward the blind side, condensation collects on the far edge of the internal gutter. Water backs up and drips down your paint behind the plastic chassis.
Dirty Blower Wheels Spitting Droplets
The barrel fan inside a mini-split collects fine lint, household dust, and moisture over time. When grime coats those curved fan blades, it disrupts the fan’s smooth aerodynamics. The spinning wheel picks up condensation droplets right off the evaporator coil and flings them out through the air louvers into your room. You can fix this issue by thoroughly cleaning the barrel wheel using a wall-mounted bib kit and foaming cleaner.
Kinked Plastic Drain Lines
Technicians run flexible corrugated tubing through the wall opening alongside the heavy copper lines. If the installer forced the bundle through too sharply, that soft drain line can pinch shut inside the wall sleeve. Condensation backs up at the pinch point and leaks into your interior wall cavity.
Foul Odors and Water: Treating Dirty Sock Syndrome
If your leaking system fills the room with the stench of damp gym sneakers, you are dealing with a common headache known as Dirty Sock Syndrome.
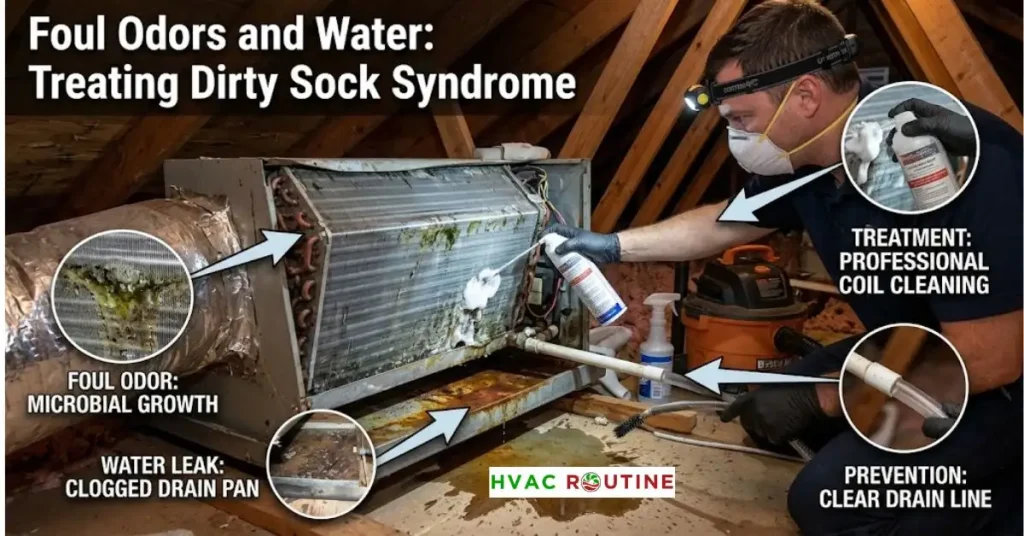
When an air conditioner cycles off, the evaporator coil stays dark, damp, and warm. Fungal spores and bacteria settle into the tiny gaps between the aluminum fins. The next time the cooling cycles on, that sudden blast of moisture reactivates the bacterial colony, releasing unpleasant odors into your supply vents. That same bacterial slime runs down into the pan, blocking the drain hole and creating foul-smelling puddles.
To clear the odor, cut main power to the air handler and remove the metal access door. Spray an expanding, self-rinsing evaporator coil cleaner across the fin face. Let the foam penetrate for twenty minutes to dissolve the sticky biofilm. Before you seal the cabinet back up, drop two slow-dissolving condensate pan tablets into the drain tray to keep bacteria from returning.
Is Leaking AC Water Toxic or Mixed With Refrigerant?
Homeowners often worry that water pooling under an indoor unit contains dangerous liquid refrigerant or toxic chemicals.
Refrigerant can never pool on your floor like water. The chemical operates under intense pressure inside a closed copper loop. If a pipe develops a crack, the refrigerant vaporizes into an odorless, invisible gas the second it contacts normal atmospheric room pressure. The puddle on your floor is simply natural humidity extracted from your indoor air.
Even though it is regular water, you should never drink it or let pets lap it up. That water washes over dirty coil fins, picks up metal oxides, and sits in a dirty drain pan full of mold spores. Stagnant drain water can also harbor Legionella pneumophila, a bacterium linked to serious respiratory problems. Wear protective gloves when cleaning the leak, and sanitize your hard floors with household disinfectant once you finish drying the area.
Building Codes and Safety Standards: IRC and IMC
Professional cooling installations must satisfy clear building safety standards to prevent property damage.
The International Residential Code (Section M1411.3) requires strict protections for any air handler installed in an attic, on a second floor, or inside an interior closet. The code dictates that installers must place a secondary drain pan with its own dedicated exterior drain line beneath the unit, or install an automatic water-level detection switch.
Similarly, the International Mechanical Code (Section 307.2.3) requires an inline float switch designed to kill power to the compressor before the primary drain pan overflows. If your attic installation lacks both a secondary pan and a float switch, your system violates modern code requirements and puts your ceiling at risk.
The True Financial Cost of Neglecting an AC Water Leak
Putting off a minor repair to save a little cash almost always backfires. Compare the modest cost of basic maintenance items against the price tag of real water damage:
- Distilled white vinegar bottle: $3 to $5
- Inline safety float switch (Safe-T-Switch): $35 to $65 for parts
- Ceiling drywall patching, texturing, and painting: $350 to $900
- Professional microbial mold remediation: $1,200 to $3,500
- Replacing buckled, water-stained hardwood flooring: $2,000 to $5,500
Taking action the minute you spot a drop saves your home and preserves your savings account.
Will Homeowners Insurance Cover AC Water Damage?
A bad indoor leak can rack up thousands in repair bills, leaving you wondering if your insurance policy will help cover the costs.
Sudden and Accidental Damage
Most standard homeowner insurance policies cover water damage when it happens suddenly and without warning. If your basement condensate pump burns out overnight and floods your finished basement, your policy typically covers structural drying, replacement baseboards, and carpet padding. Remember that insurance covers the resulting water damage to your property, but will not pay to fix or replace the broken HVAC unit itself.
The Maintenance Exclusion
Adjusters routinely deny claims tied to ongoing, long-term neglect. If an adjuster inspects your attic and spots heavy rust layers on the unit frame, water-blackened wood joists, and deep rot, they will determine the leak developed over months of ignored maintenance. Standard policies explicitly exclude damage caused by preventable wear and tear. Save your service receipts and log your regular filter changes so you can prove you cared for your equipment.
Diagnostic Checklist: Identify Your Leak in Minutes
Use this straightforward diagnostic chart to match your leak’s symptoms to the most likely mechanical fault.
| What You See or Hear | Likely Root Cause | Risk Level | Can You Fix It Yourself? |
| Water pooling around the base of the air handler | Plugged 3/4-inch PVC drain pipe | Moderate | Yes (Shop vac or bicycle pump) |
| Water dripping steadily from your roof soffit pipe | Blocked primary drain; secondary pan filling | High | Yes (Clear primary line now) |
| Cold copper line sweating and dripping water | Damaged or missing foam pipe insulation | Low | Yes (Wrap with split foam insulation) |
| Window unit leaking water over interior sill | Unit lacks slight backward tilt toward yard | Moderate | Yes (Tilt casing 1/4″ to 1/2″ back) |
| Water stains spreading across ceiling drywall | Overflowing attic pan or split drain joint | Emergency | Partial (Shut off electrical power) |
| Heavy frost or ice coating the copper line set | Dirty filter or low refrigerant charge | High | Filter: Yes / Refrigerant: No |
| Overflowing collection tank on basement floor | Failed condensate pump motor or stuck float | Moderate | Yes (Clean or swap pump) |
| Water dripping down wall behind a mini-split | Unlevel wall bracket or pinched drain line | Moderate | Yes (Check level and line clearance) |
| Louvers spitting water with a musty odor | Dirty blower wheel or coil mold colonies | Moderate | Yes (Apply foaming coil cleaner) |
| Clean puddle around outdoor condenser pad | Normal condensation running off base pan | None | Normal summer operation |
Overlooked Technical Reasons Your AC Leaks
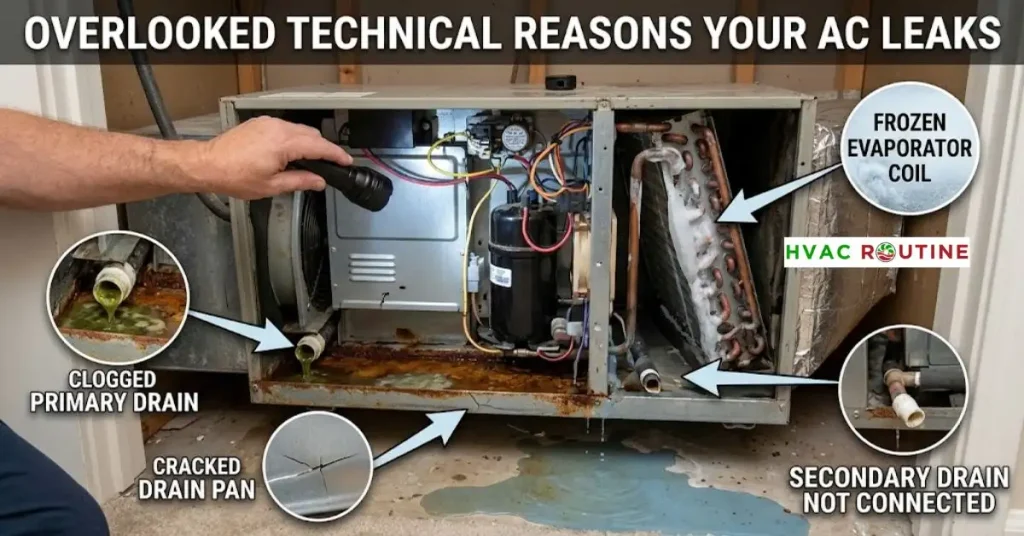
When standard fixes fail to solve your problem, one of these subtle system design issues could be the culprit.
Negative Pressure Cabinets and Missing P-Traps
In draw-through air handlers, the blower fan sits past the evaporator coil. This layout creates powerful negative air pressure inside the coil compartment.
If your installer skipped adding an inverted P-trap to the exterior PVC line, the blower fan will pull air backward into the drain opening while running. This inward suction traps water inside the pan. The moment your thermostat satisfies and the blower shuts down, that trapped water rushes forward all at once and overflows the pan. A properly installed P-trap maintains a water seal that prevents air from entering while letting water drain smoothly.
High Static Pressure From Restrictive Filters
Many homeowners purchase dense, high-MERV filters hoping to capture microscopic allergens. However, filters rated at MERV 13 or above choke airflow in older duct systems.
This restriction spikes the external static pressure inside the cabinet, starving the evaporator coil of the warm air it needs. The coil temperature plummets, frost forms along the copper loops, and melting ice overflows your pan during the off-cycle. Stick with MERV 8 to 11 filters unless an HVAC professional confirms your ductwork can handle higher static pressure.
Tools and Safety Supplies for DIY Troubleshooting
Gather these simple supplies before you start working on your drainage system:
- A wet-dry shop vacuum or an ordinary hand bicycle pump
- One gallon of standard distilled white vinegar
- Split-foam pipe insulation tubes and closed-cell foam tape
- 5/16-inch and 1/4-inch magnetic nut drivers for cabinet panels
- A non-contact voltage pen to test for live electrical currents
- A pocket torpedo bubble level
- An LED headlamp or bright work light
- Clean microfiber rags and an old towel supply
- Self-rinsing foaming evaporator coil cleaner
Avoid pouring caustic lye drain cleaners down your AC drain pipe. These chemicals dissolve PVC glue joints, make plastic fittings brittle, and release irritating chemical fumes through your supply registers. Stick with mechanical suction, gentle air pressure, and white vinegar.
When to Call a Licensed HVAC Professional
While you can tackle basic clogs and dirty filters with everyday tools, certain system failures require licensed training and specialized diagnostic gear.
- Refrigerant Line Leaks: Federal regulations under EPA Section 608 prohibit anyone without certification from buying, handling, or charging refrigerants like R-410A. Certified technicians pinpoint leaks using nitrogen pressure tests or electronic sniffer probes, braze damaged copper lines, and pull a deep vacuum before charging the system.
- Cracked Primary Pans on Cased Coils: Swapping out a cracked primary drain pan on an internal A-coil requires pumping down the refrigerant, cutting copper line sets, and unbolting the heavy coil casing.
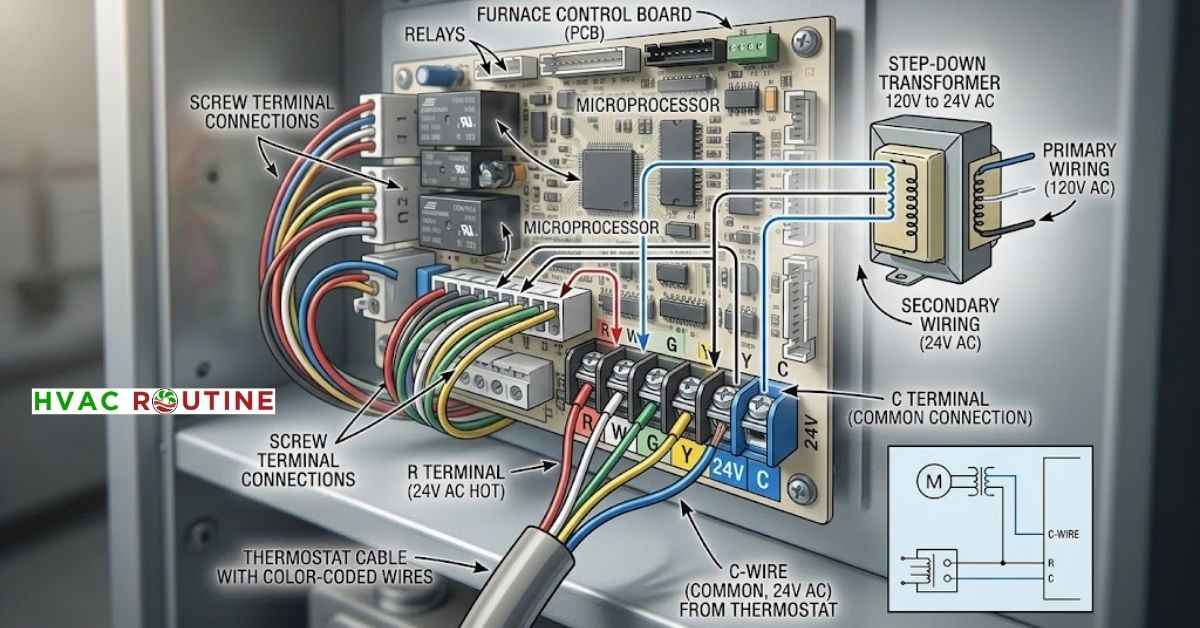
- Water Soaking Electrical Components: If leaking water drips onto your furnace control board, transformer, or blower motor, keep the breaker off and call a technician. Moisture ruins solid-state circuits and creates hidden fire hazards that require testing with a multimeter.
Typical HVAC Repair Price Ranges
- Clearing a clogged condensate line: $75 to $200
- Installing an inline safety float switch: $100 to $250
- Replacing an external condensate pump: $150 to $350
- Locating, repairing, and recharging a refrigerant leak: $300 to $1,200
- Replacing an evaporator coil assembly: $1,200 to $2,500
Smart Tech Upgrades to Prevent Future Water Damage
You can install modern smart hardware to cut power to your AC before water ever touches your floorboards.
Inline Float Switches
Ask a technician to install an electronic float switch (such as a Safe-T-Switch) into the auxiliary port of your primary drain pan or directly on your drain line. This magnetic sensor connects in series with your thermostat’s low-voltage red wire. If water backs up by even half an inch, the switch trips and shuts down your cooling system instantly.
Wi-Fi Water Leak Sensors
Place battery-operated smart water sensors inside your secondary drain pan and on the floor beneath your air handler. These sensors link directly to your home Wi-Fi network. The second water bridges the sensor’s metal contacts, your smartphone receives a notification while an audible siren sounds in your home, giving you time to respond even when you are away.
Common Air Conditioner Leak Questions Answered
Can I run my air conditioner while it is actively leaking water?
No, you should keep your cooling system off until you locate and fix the leak. Running the unit while water pools risks burning out your blower motor, destroying your system control board, and rotting ceiling drywall.
How much water should an air conditioner drain each day?
In hot, humid climates, a standard three-ton central air conditioner can pull five to twenty gallons of water from indoor air every single day. Every drop of that water should flow outdoors through the drain pipe rather than pooling in your home.
Why does my AC leak water only when I turn it off?
This behavior points straight to a frozen evaporator coil. While your system runs, the ice stays frozen to the metal coil fins. The moment you switch the system off, the coil warms up and that thick block of ice melts all at once, overwhelming your drain pan.
Is it safe to pour bleach into my AC drain line?
Avoid using chlorine bleach in your drain line. Bleach fumes can circulate through your ductwork and irritate your eyes and lungs. Bleach can also break down the chemical bonds in your PVC glue, leading to hidden leaks behind your drywall. Use distilled white vinegar instead.
Seasonal Action Plan: Keep Your Drain Lines Clear
Work through this straightforward maintenance schedule to keep your drainage system operating smoothly all summer:
- Every 30 to 60 Days: Pull your pleated air filter and replace it the second dust dulls the filter media.
- Every 60 Days: Pour one cup of distilled white vinegar into your condensate line cleanout port to dissolve young algae colonies before they form clogs.
- Mid-Season Check: Inspect your condensate pump reservoir and make sure the float switch moves freely without catching on sediment.
- Every Spring: Schedule a seasonal tune-up with a licensed HVAC technician to check refrigerant pressures, inspect your drain pan, and test your secondary safety switches before summer heat hits.